29 April 2009

Preparation for the PC Hardware Servicing Certification

I was not able to update my blog lately because I'm attending an ICT training for Top 3 Technical Vocational High Schools in Tagum National Trade School, Tagum City. The training started last April 27, 2009 and will end on May 1, 2009.

After a three-day dry run in the 5 core competencies for PC Hardware Servicing National Certification II, our group is now preparing for the assessment. The first batch will have their assessment today. I will have mine tomorrow. Wish me luck :)

Read more...

27 April 2009

How to password protect your powerpoint presentation?

Microsoft PowerPoint is a powerful tool to use for creative presentations. Some of my students would always complain that their presentations saved in their own folder in My Documents are deleted or altered by others. I found a solution to this problem.

In office network your computer can be accessed by any other user and made some undesirable changes to it. You can prevent this by protecting your document by applying password so that unauthorized person can not display as well as modify your document.


Password to open the document:
If it is applied then you have to give the correct password to open the document, otherwise you cannot open the document.

Password to modify the document:

If it is applied then you have to give the correct password to modify the document, otherwise your document is opened but you cannot modify the document. It means that your document becomes read-only.

To apply a password to your PowerPoint presentation, follow these steps.
- Open Save As dialog box by selecting "Save As" command from File menu.
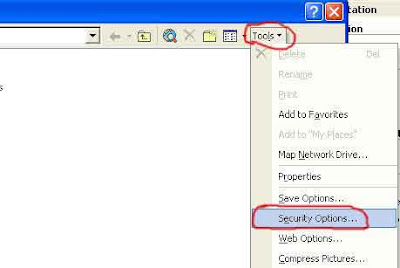
- Click "Tools" button of Save As dialog box and choose "Security Options" from drop down menu, "Save" dialog box appears as shown in figure below.
- Enter first password in "Password to open" text box and second password in "Password to modify" text box (if required) and click "Ok" button of dialog box. Microsoft PowerPoint will open "Confirm Password" dialog box for the confirmation of passwords. The maximum length of password is 15 characters.
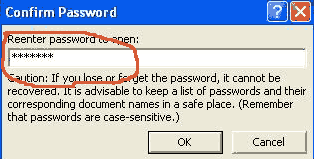

- Re-enter the password to open and password to modify and click "Ok" button of Confirm Password dialog boxes one by one.
- Click "Save" button of Save As dialog box.

Read more...

24 April 2009

How to Insert your Digital Signature into Word Documents?

How can you insert your Digital Signature into Word Documents? Most people don't give value that there is any technique to sign files electronically and then send via fax or email.

Follow the given steps to insert your signature electronically in Word documents:

First of all scan your signature page and then save image using (.GIF or .JPEG) extension. Now you have scanned image of your signature, save the image on your computer and note that file name where you save it.

Click on Start button, go to Program then click on Microsoft Word to run the word page.


Now go to Insert menu, click on Picture> From File then browses your scanned signature file and click Insert button to add this file in word.


If your signature is not looking so good and its size is wrong then you should rescan your signature then repeat all the steps to insert it again.


To save your signature for reuse in future documents, highlight the signature graphic, and then choose insert AutoText-New. Here a new Create Auto Text dialog box will appear. Name your signature and click ok.


Now just type the name the file of your signature and press Enter to insert your signature in the future or choose insert AutoText-Normal then click on signature name. There is no need of ink, Word jump down in your digital signature.

Source: Computer Tips

Read more...

Lupon Celebrates its 56th Town Fiesta

The curtain rises in Lupon's 6 day celebration with the series of shows. The celebration will start on the 23rd with a boxing match undertaken by the Sports Development, on the 24th a magic show will be shown sponsored by the MRIC or Municipal Rural Improvement Club of Lupon, on the 25th a concert with the Tagum City Band will be held at the same venue, while on the 25th a dance and fashion concert will be held in Lupon gymnasium, on the 27th a Disco and on the 28th an LGU sponsored Pabibo sa Summer 09.

The LGU has also treat the people of this municipality,they have organized an Amateur Singing Contest on the 26th and a series of hilarious and enjoyable parlor games, nevertheless will be held on the day of 25th, its one way of saying VIVA SAN VICENTE FERRER and thinking the Lord above for the wonderful gifts and hers bestowed upon the people and the whole community of Lupon.


(image courtesy of www.lupon.gov.ph)

Read more...

How to clear all windows history files with a single click?

Just recently I tried to manage all types of user history in windows operating system of all the computers in the computer laboratory. I found this tip from Computer Tips site. This is a built-in feature of all windows keeps track the user's history, for example the websites you have visited, the documents you have opened and the keywords or files for which you've searched. This is very useful, if you are sharing your computer with others or you do not want that the other persons know about your last visited documents history. You can clear these kinds of user's history with a single click on desktop icon named Cleanmru.reg. There is no need to clear each history file one by one. This trick will work in nearly all of the windows versions like windows 2000, XP and 2003.

Follow the given steps for configuration to clear recently opened documents automatically:

To edit the computer registry, first you should log onto your computer with administrative rights.
Here copy the following 6 lines and paste in notepad then save with the name Cleanmru.reg on your desktop.
REGEDIT4
[-HKEY_CURRENT_USER\Software\Microsoft\Internet Explorer\TypedURLs]
[-HKEY_CURRENT_USER\Software\Microsoft\Windows\CurrentVersion\Explorer\RunMRU]
[-HKEY_CURRENT_USER\Software\Microsoft\Windows\CurrentVersion\Explorer\RecentDocs]
[-HKEY_CURRENT_USER\Software\Microsoft\Windows\CurrentVersion\Explorer\ComDlg32\
LastVisitedMRU]
[-HKEY_CURRENT_USER\Software\Microsoft\Search Assistant\ACMru]


When you double-click Cleanmru.reg icon to remove the windows history, a small dialog box will appear with the information "Are you sure you want to add the information in C:\Documents and Settings\Administrator\desktop\Clearmru.reg to the registry?"


At the end, you will get the message "Information in C:\Documents and Settings\Administrator\desktop\Clearmru.reg has been successfully entered into the registry." Click on Ok button and verify that your all history will have been clear.

Read more...

  © Free Blogger Templates 'Greenery' by Ourblogtemplates.com 2008

Back to TOP